Go Back
Close-up of a hand holding a gender reveal cake pop styled like an ice cream cone, with blue drizzle and pink and blue sprinkles on top of white chocolate. Three additional cake pops with pink and blue drizzles are stacked on a white plate in the background.
Sierrah Schmidt

Ice-cream Cone Gender Reveal Cake Pops

These adorable gender reveal cake pops are shaped like mini ice cream cones and reveal a pink or blue center when you bite in. Perfect for summer gender reveals to surprise friends and family with something extra sweet!
Prep Time 45 minutes
Cook Time 25 minutes
Chill 40 minutes
Total Time 1 hour 50 minutes
Servings: 12
Course: Dessert
Cuisine: American

Ingredients
  

  • (2) 15 oz Cake Mix
  • Eggs, water, butter (as directed on cake mix)
  • Pink and blue food coloring
  • 3/4 or less cups vanilla frosting
  • 12 Sugar cones
  • 15 oz White melting wafers
  • Pink and blue sprinkles

Equipment

  • Mixing bowls
  • Mixer
  • Baking sheet
  • Parchment paper
  • Cookie scoop
  • Microwave safe bowl
  • Squeeze bottle
  • Cake pop sticks
  • Cake pop stand

Method
 

  1. Bake Your Cakes: Prepare your cake mixes as directed. Bake one 9x13 white cake and two 6-inch rounds—one tinted pink, the other blue. Let them cool completely.
  2. Crumble and Mix: Crumble the cakes into three separate bowls. Add frosting to each, starting with 1 tablespoon at a time. Mix until the crumbs hold together like dough (do not over-frost).
  3. Form the Surprise Centers: Flatten 3 tablespoons of white cake dough in your hand. Roll 2 tablespoons of pink or blue dough into a ball and place in the center. Wrap the white dough around the colored ball and roll smooth.
  4. Insert Cake Pop Sticks: Melt some of the white chocolate wafers. Dip one end of each stick into the chocolate, then insert it into a cake ball. Place them on a tray and refrigerate for 30 minutes.
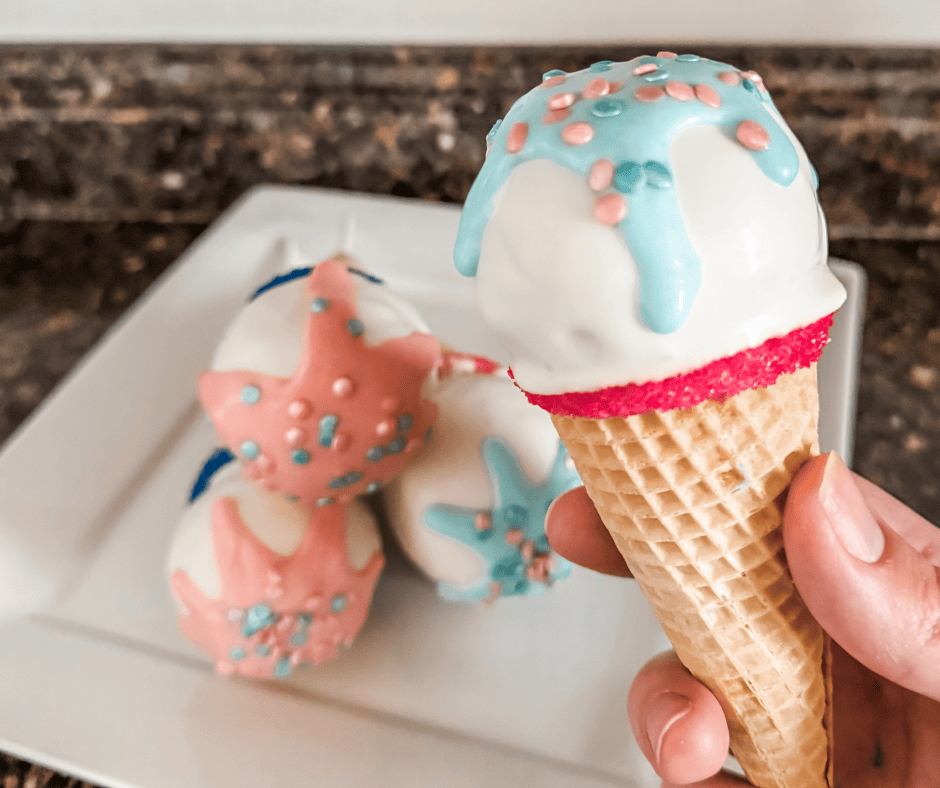
  5. Decorate the Cones: Melt more white chocolate. Dip the rim of each sugar cone in chocolate, then dip into pink or blue sprinkles. Set upright on a lined baking sheet and chill for 10 minutes.
  6. Dip and Assemble: Dip each chilled cake pop into melted white chocolate and gently tap off the excess. Immediately press into a sprinkle-covered cone. Set upright in a stand or glass and let them firm up.
  7. Drizzle and Decorate: Divide the remaining chocolate into two bowls and color with pink and blue food dye. Pour into squeeze bottles and drizzle over the tops. Add sprinkles before it sets.

Notes

  • You can prep the cake balls ahead and chill overnight.
  • The first time I made these I knocked them over and they all broke on the floor because I didn’t have a good cake pop stand so I definitely recommend one.
  • Take your time coating your cake pops in the melting chocolate. You want enough excess to drip off so that when you insert into the cone it pools slightly but does not over flow and drip down.